
The Mailer Review/Volunteer/Remediating Articles: Difference between revisions
m (Added image and notice.) |
(Updates.) |
||
| Line 1: | Line 1: | ||
{{DISPLAYTITLE:''The Mailer Review''/Volunteer/Translating Articles}} | {{DISPLAYTITLE:<span style="font-size:22px;">''The Mailer Review''/Volunteer/</span>Translating Articles}} | ||
{{Large|A Guide for Volunteer Digital Editors}} | {{Large|A Guide for Volunteer Digital Editors}} | ||
{{Byline|last=Lucas|first=Gerald R.|abstract=A digital editor’s guide for translating print articles to digital for ''{{MR}}''.}} | {{Byline|last=Lucas|first=Gerald R.|abstract=A digital editor’s guide for translating print articles to digital for ''{{MR}}''.}} | ||
| Line 38: | Line 38: | ||
<blockquote> | <blockquote> | ||
<code><nowiki>{{DISPLAYTITLE:''The Mailer Review''/Volume 12, 2018/Reflections}}</nowiki></code> | <code><nowiki>{{DISPLAYTITLE:<span style="font-size:22px;">''The Mailer Review''/Volume 12, 2018/</span>Reflections}}</nowiki></code> | ||
</blockquote> | </blockquote> | ||
Putting two apostrophes (<code><nowiki>''</nowiki></code>) on both sides of <code><nowiki>The Mailer Review</nowiki></code> will italicize the journal name in the published document; like from our [[The Mailer Review/Volume 12, 2018/Reflections|example above]]. Once you’ve entered your title, click the “Show preview” button under the editor window to see the results.{{efn|Get into the habit of clicking this button with every bit that you add to the article. It allows you to quickly see if you’ve made a mistake, so you can fix it before saving.}} Note that the title must otherwise be exactly the same, or the system will ignore the code and spit out an error. If it does, just review your code carefully and fix what’s needed. | The <code><nowiki><span></nowiki></code> tag shrinks the root page names to highlight the title of the page. Putting two apostrophes (<code><nowiki>''</nowiki></code>) on both sides of <code><nowiki>The Mailer Review</nowiki></code> will italicize the journal name in the published document; like from our [[The Mailer Review/Volume 12, 2018/Reflections|example above]]. Once you’ve entered your title, click the “Show preview” button under the editor window to see the results.{{efn|Get into the habit of clicking this button with every bit that you add to the article. It allows you to quickly see if you’ve made a mistake, so you can fix it before saving.}} Note that the title must otherwise be exactly the same, or the system will ignore the code and spit out an error. If it does, just review your code carefully and fix what’s needed. | ||
== Header == | == Header == | ||
| Line 65: | Line 65: | ||
As I mentioned above, the <code>{{tl|byline}}</code> connected with the author’s bio. As of this writing, all bios should be posted, so there is no need to do anything further. | As I mentioned above, the <code>{{tl|byline}}</code> connected with the author’s bio. As of this writing, all bios should be posted, so there is no need to do anything further. | ||
== | == Body == | ||
Here is where you translate from PDF to the wiki. Adding the body of the article will take the most effort and attention to detail, as many typos are introduced into the digital text as part of the PDF creation process. I recommend proceeding paragraph by paragraph. | |||
Open the PDF, highlight and copy a paragraph, paste the paragraph into the editing window, and proofread for errors (see '''Figs. 3–5''' below; click the images to enlarge). Common errors include hyphenated words (these will be broken words with a hypen and space), numbers, lack of necessary text decoration like italics, missing spaces, and superfluous print information like page numbers. All of these must be corrected. Use the original PDF as your guide. | |||
== End Notes == | <gallery mode=packed heights=200px> | ||
This section houses an author’s explanatory footnotes, like the “Notes” section at the bottom of this page. Notes may be inserted in the body of the text, using <code>{{tl|efn}}</code>, for example: | File:Mr-orig.jpg|'''Fig 3'''. Original PDF. Copy the paragraph. | ||
File:Mr-errors.jpg|'''Fig 4'''. Errors indicated. | |||
File:Mr-corrected.jpg|'''Fig 5'''. Errors Fixed. | |||
</gallery> | |||
Once the paragraph is finished, hit return twice (skip a line between paragraphs) and start the next one. Repeat this process until the end of the document. | |||
{{notice|Most articles that cite sources will do so using MLA style, so parenthetical citations will appear in the text. See [[#Sourcing|Sourcing]] below for instructions on translating these to shortened footnotes. For instructions on inserting explanatory endnotes, see [[#End Notes|Endnotes]].}} | |||
=== Block Quotations === | |||
Many articles use block quotation when quoting longer passages of primary texts. Just paste in the quotation like you would a paragraph, then surround it with the <code><nowiki><blockqoute> . . . </blockquote></nowiki></code> tags, for example: | |||
<blockquote> | |||
<code><nowiki><blockquote>To the savage, dread was the natural result of any invasion of the supernatural: if man wished to steal the secrets of the gods, it was only to be supposed that the gods would defend themselves and destroy whichever man came too close. By this logic, civilization is the successful if imperfect theft of some cluster of these secrets, and the price we have paid is to accelerate our private sense of some enormous if not quite definable disaster which awaits us.{{sfn|Mailer|1965|p=159}}</blockquote></nowiki></code> | |||
</blockquote> | |||
Note this quotation contains a citation; see [[#Sourcing|Sourcing]] below for an explanation. | |||
=== Images === | |||
See [[The Mailer Review/Volunteer/Advanced Editing|Advanced Editing]]. | |||
== Endnotes == | |||
This section houses an author’s explanatory endnotes or footnotes, like the “Notes” section at the bottom of this page. Notes may be inserted in the body of the text, using <code>{{tl|efn}}</code>, for example: | |||
<blockquote> | <blockquote> | ||
<code><nowiki>. . .opportunity with a "lady's magazine",{{efn|In ''Double Life'', Lennon explains that Pearl Kazin, an editor at ''Harper's Bazaar'' had invited Mailer to write something for the magazine, to which Mailer replied: "I'm still too young and too arrogant to care to write the kind of high-grade horseshit you print in ''Harper's Bazaar''" (142–43).}} Mailer conceived . . .</nowiki></code> | <code><nowiki>. . .opportunity with a "lady's magazine",{{efn|In ''Double Life'', Lennon explains that Pearl Kazin, an editor at ''Harper's Bazaar'' had invited Mailer to write something for the magazine, to which Mailer replied: "I'm still too young and too arrogant to care to write the kind of high-grade horseshit you print in ''Harper's Bazaar''" (142–43).}} Mailer conceived . . .</nowiki></code> | ||
</blockquote> | </blockquote> | ||
This note will be indicated by a superscript, small letter, like <sup>[a]</sup> —except it will be a hyperlink. Now, you must have place for these notes to be listed near the end of the document, just above the Citations section: | |||
<blockquote> | |||
<code><nowiki>== Notes ==</nowiki><br /> | |||
<nowiki>{{notelist}}</nowiki></code> | |||
</blockquote> | |||
See [[The Mailer Review/Volume 9, 2015/“Up to the Nostrils in Anguish”: Mailer and Bellow on Masculine Anxiety and Violent Catharsis|this article]] for another, more complex example. For a more thorough discussion of this function, see [[w:Template:Efn|Template:Efn]] on Wikipedia. | |||
== Sourcing == | == Sourcing == | ||
| Line 86: | Line 118: | ||
Add the ''Review'' footer with the code <code>{{tl|Review}}</code> on a line by itself. This will insert the volume navigation information box. | Add the ''Review'' footer with the code <code>{{tl|Review}}</code> on a line by itself. This will insert the volume navigation information box. | ||
== Categories == | == Navigation Menu and Categories == | ||
== Notes == | == Notes == | ||
{{notelist}} | {{notelist}} | ||
Revision as of 10:56, 4 July 2020
A Guide for Volunteer Digital Editors
Gerald R. Lucas
Abstract: A digital editor’s guide for translating print articles to digital for The Mailer Review.
Welcome, volunteer, or Assistant Digital Editor. We’re glad you decided to lend your expertise and time in helping to grow our Digital Humanities project. This guide is written specifically for volunteer digital editors who want to help in moving, or “translating,” our print version of The Mailer Review to the digital version here on Project Mailer. Please read this document in for specific directions on translating your article to be used on the screen.
We use the word “translating” here to emphasize that reading on paper is a different activity than reading on the screen. In fact, we might say that we don’t really read articles on the screen at all: we use them. So, how do we translate a document from a medium that emphasizes a sit-back, passive activity to one that promotes a lean-forward, active one? Documents meant to be used on the screen should have different qualities than paper documents. This guide breaks down the qualities we should consider when creating a digital document on this site. We try to cover most items, but being a digital editor often requires us to make it up as we go along.
When we translate, we should always keep this question in mind: what is the most logical way to make this document fit the expectations of those who will be using it? Let’s try to detail our current approach.[a]
All questions and discussion of this article should be posted on the talk page. |
I will try to include everything you need on this document, but I will often link to Wikipedia for more detailed explanations of certain concepts and procedures. I hope that you will not need these additional resources, but they are there for further clarification if necessary. I recommend opening links in tabs, so you don’t get lost, and you can keep certain tabs open for reference.
Get Started
The first order of business is to request an account and get your first article for editing. These are both accomplished by sending an email to editor![]() projectmailer.net; they both could be done in the same email.
projectmailer.net; they both could be done in the same email.
If you’re brand new to MediaWiki, the software that runs this web site, you should take a couple of tutorials to familiarize yourself with some of the basics. Begin with Wikipedia’s Help:Introduction which will take you through a series of tutorials designed to familiarize you with the essentials.[b] Take the tutorials on the source editor (not the visual) which uses wiki markup, as that is the only available editor on PM.
Get Your Account
First off, you need to request an account. If you have a particular user name in mind, let me know. Mine is Grlucas, but yours can be anything you’d like. I will create an account for you with a temporary password using the email address you sent the request with. You will need to confirm your account, log in, and change your password. Then, you’re ready to edit.
Get Your Article
Begin your journey by requesting an article from the editor. If you have no preference, just send an email to editor![]() projectmailer.net and ask for the next article, or request a red link article (meaning it needs to be added) from any volume available, being sure to give the volume number. I will send you the article as a PDF, including an abstract (if it has one) and writer biography.[c]
projectmailer.net and ask for the next article, or request a red link article (meaning it needs to be added) from any volume available, being sure to give the volume number. I will send you the article as a PDF, including an abstract (if it has one) and writer biography.[c]
Before Editing

An obvious way to approach this task would be to look at an example article to see how another digital editor translated it, like Andrew M. Gordon’s “Mailer’s Use of Wilhelm Reich,” or really any of the other available texts. If you go to the page, you can click the “Edit” tab to get to the editor and review all of the wiki coding that presents the usable text (see Fig 1).
The rest of this document breaks down each of the common elements that every article will use. You should keep your example article open in a tab so you can refer to it, if necessary.
Finally, go to the volume your article is in, and click on the title’s red link. This should bring up an editor, so that you are now editing the article.
Subpages
We have recently switched to using subpages for articles, so they fall into a hierarchical structure under the appropriate volumes. This should not really be an issue in your editing, but I just wanted to mention it in case you saw older articles that did not follow the same naming scheme. All articles assigned to volunteer editors will use the subpage structure.
Title
If you clicked on the red link to begin creating the article, the title has been chosen for you. However, we want to italicize The Mailer Review, so we have to use a code called {{DISPLAYTITLE}}. With this element, you can insert necessary text formatting, like italics:
{{DISPLAYTITLE:<span style="font-size:22px;">''The Mailer Review''/Volume 12, 2018/</span>Reflections}}
The <span> tag shrinks the root page names to highlight the title of the page. Putting two apostrophes ('') on both sides of The Mailer Review will italicize the journal name in the published document; like from our example above. Once you’ve entered your title, click the “Show preview” button under the editor window to see the results.[d] Note that the title must otherwise be exactly the same, or the system will ignore the code and spit out an error. If it does, just review your code carefully and fix what’s needed.
Header
Next, you need to insert the proper header for the volume, in the form of {{MRxx}} where “xx” is the two-number volume. For example, volume 12 would be {{MR12}}.
Anything surrounded with double brackets calls a template to be transcluded. Basically, templates are bits of code or boilerplate that can be used on multiple pages. This saves us from having to repeat the same information on multiple pages.
This header should appear on the top of all Review content.
Byline

The byline template {{byline}} should come next. It will include the writer’s or editor’s name, an abstract (if applicable), a note(s) (if applicable), and a short url. Here’s an example of the byline code:
{{Byline|last=Dickstein|first=Morris|url=https://prmlr.us/mr07dick|abstract=Mailer has been . . . uniform edition.|note=This paper served . . . me to participate.}}
For an explanation of all the variables, see {{byline}}.
Once you’ve entered the code, check it by previewing. The author’s name should be in blue, showing that the link leads to his or her biography. If it’s red, check your spelling. I have entered all authors and editors, so this should be working correctly. Next, scroll to the bottom of the document. You should see the correct category listed (see Fig 2); we’ll discuss more categories below. This will either be “Written by First Last” or “Edited by First Last.” This link, too, should be blue.
Author Bio
As I mentioned above, the {{byline}} connected with the author’s bio. As of this writing, all bios should be posted, so there is no need to do anything further.
Body
Here is where you translate from PDF to the wiki. Adding the body of the article will take the most effort and attention to detail, as many typos are introduced into the digital text as part of the PDF creation process. I recommend proceeding paragraph by paragraph.
Open the PDF, highlight and copy a paragraph, paste the paragraph into the editing window, and proofread for errors (see Figs. 3–5 below; click the images to enlarge). Common errors include hyphenated words (these will be broken words with a hypen and space), numbers, lack of necessary text decoration like italics, missing spaces, and superfluous print information like page numbers. All of these must be corrected. Use the original PDF as your guide.
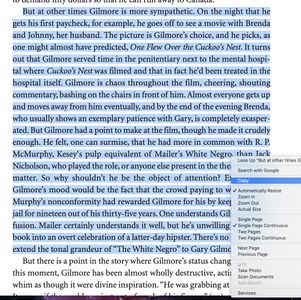
Fig 3. Original PDF. Copy the paragraph.
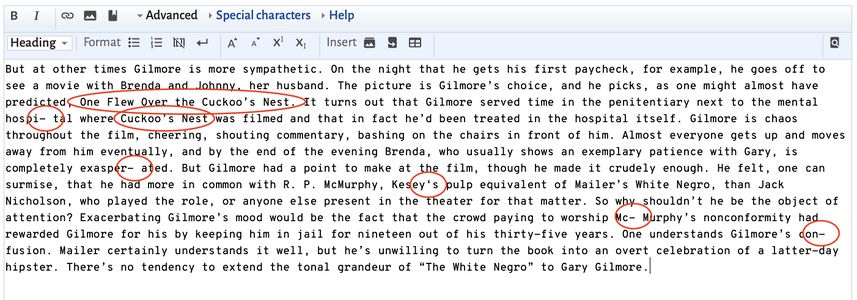
Fig 4. Errors indicated.
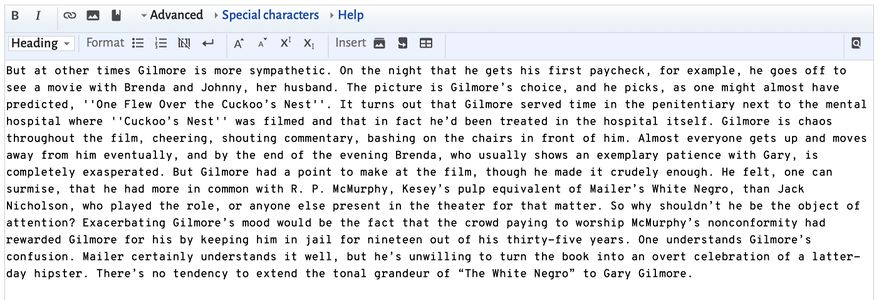
Fig 5. Errors Fixed.


Once the paragraph is finished, hit return twice (skip a line between paragraphs) and start the next one. Repeat this process until the end of the document.
Block Quotations
Many articles use block quotation when quoting longer passages of primary texts. Just paste in the quotation like you would a paragraph, then surround it with the <blockqoute> . . . </blockquote> tags, for example:
<blockquote>To the savage, dread was the natural result of any invasion of the supernatural: if man wished to steal the secrets of the gods, it was only to be supposed that the gods would defend themselves and destroy whichever man came too close. By this logic, civilization is the successful if imperfect theft of some cluster of these secrets, and the price we have paid is to accelerate our private sense of some enormous if not quite definable disaster which awaits us.{{sfn|Mailer|1965|p=159}}</blockquote>
Note this quotation contains a citation; see Sourcing below for an explanation.
Images
See Advanced Editing.
Endnotes
This section houses an author’s explanatory endnotes or footnotes, like the “Notes” section at the bottom of this page. Notes may be inserted in the body of the text, using {{efn}}, for example:
. . .opportunity with a "lady's magazine",{{efn|In ''Double Life'', Lennon explains that Pearl Kazin, an editor at ''Harper's Bazaar'' had invited Mailer to write something for the magazine, to which Mailer replied: "I'm still too young and too arrogant to care to write the kind of high-grade horseshit you print in ''Harper's Bazaar''" (142–43).}} Mailer conceived . . .
This note will be indicated by a superscript, small letter, like [a] —except it will be a hyperlink. Now, you must have place for these notes to be listed near the end of the document, just above the Citations section:
== Notes ==

{{notelist}}
See this article for another, more complex example. For a more thorough discussion of this function, see Template:Efn on Wikipedia.
Sourcing
There are two approaches to sourcing, depending on the complexity of the author’s citations. If the article has just a handful of sources, you might just include them in the body of the article and will just use a “Citations” section at the end of the document. If there are many sources, say over-ten, you should have a “Citations” section and a “Works Cited” section and use the shortened footnotes approach.
Citations
Works Cited
Add the Review footer with the code {{Review}} on a line by itself. This will insert the volume navigation information box.
Notes
- ↑ Like with any other digital document, there are no strict rules for what makes the best digital document. We are still in an incunabular stage when it comes to the digital. So think of these as guidelines on how we might approach our work here. There may be a better way. If so, we may change our approach. But for now, this is how we do it.
- ↑ This will suggest you make a Wikipedia account to continue. This step is optional.
- ↑ PDF is how I get the final digital form of the journal, which is made for print, so it always contains digital errors. Part of our job is to be sure we catch and correct these errors.
- ↑ Get into the habit of clicking this button with every bit that you add to the article. It allows you to quickly see if you’ve made a mistake, so you can fix it before saving.